You are neophyte in the domain of analogue? Or you simply wish to find out more about the different components of your turntable and their use? maPlatine.com explains all of this thanks to an explanatory diagram of a vinyl turntable, accompanied by a few definitions.
Diagram of a turntable
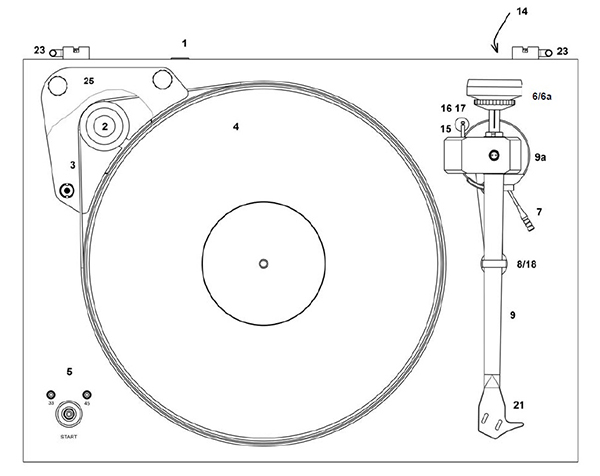
1. Power supply outlet: This power supply outlet serves to power the turntable and make it function.
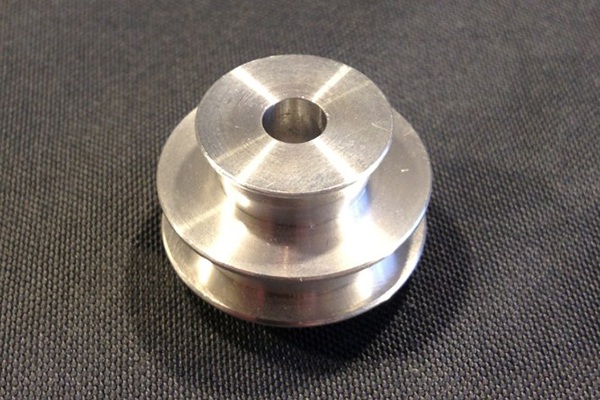
2. Pulley: This small piece is mounted on the motor of the vinyl turntable. It welcomes the belt drive and enables to make it rotate when playing a record. This pulley can have several grooves depending on the speed chosen and therefore the type of vinyl record (33 RPM, 45 RPM, or 78 RPM).
3. Drive belt: It comes in the form of an elastic which serves to rotate the platter of the turntable. The drive belt absorbs vibrations of the motor and thus enables to avoid interference noises. Depending on the model of your turntable, the drive belt can vary. This is why we offer a large selection of drive belts for turntables.
4. Platter: This is where you will place your record or a felt, leather, or cork platter mat. There exist different models of platters for turntables, manufactured with different materials: medium, aluminium, acrylic, etc. The sound restitution can be different depending on the material used. You can change the platter and therefore upgrade your turntable.
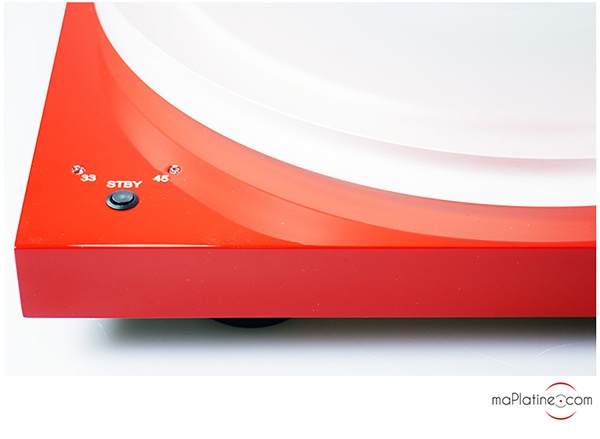
5. ON/OFF switch, speed change: This switch serves to turn on your turntable. If your turntable is equipped with a speed change (ex: Audio Technica LP5 turntable, Pro-Ject 2 Xperience SB turntable…), this is where you will select the speed (33 RPM, 45 RPM, or 78 RPM), depending on the format of your vinyl record.
6. Tonearm counterweight: This component serves to adjust the tonearm and tracking force of your phono cartridge. The tracking force of the phono cartridge is different depending on the manufacturer. Find out more about this setting in our shopping guide “How to set up your turntable correctly”.
7. Tonearm lifter: This component serves to put or remove more easily the tonearm (and therefore the phono cartridge) from the vinyl record and avoid false manipulations. According to the model of your turntable, the tonearm lifer will either be manual or automatic.
8/18. Tonearm rest: This is where the tonearm rests when you are not listening to any records on your turntable. For additional security, the majority of turntables are equipped with a clasp system to properly lock in place the tonearm.
9. Tonearm: It is a key component of the turntable since it holds the phono cartridge. There exist different models of tonearms: size, material used, technology, etc.
14. RCA/ DIN connectors: This is where you need to connect your phono cable which will enable you to connect your turntable to your phono preamp. In case you buy a turntable with a captive phono cable, this connector does not exist since you will not be able to disconnect the cable (captive).
15. Antiskating creased fingertips: This is where the antiskating weight is placed. It can be positioned on different notches. When you receive your turntable, tested and set up beforehand in our workshop, it is the only adjustment you need to make. To help you, our technicians fill out a set up form indicating the exact location of the antiskating.
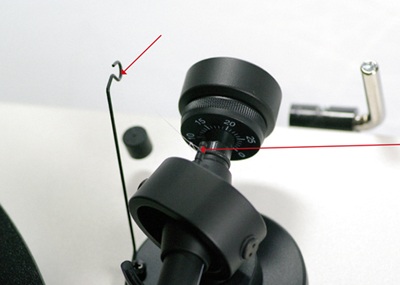
16. Antiskating: It generally has the form of a small knob, connected to the tonearm of the turntable via a nylon string. It serves to correct the centripetal force on the phono cartridge which pushes the stylus towards the inside of the vinyl record. The antiskating therefore serves to avoid premature wear of your LPs as well as your stylus. With other manufacturers such as REGA or Clearaudio turntables, the antiskating can come in the form of a magnet or a graduated knob (spring).
21. Headshell with phono cartridge + tonearm lifter fingertip: This is the component on which is screwed the phono cartridge. The tonearm lifter fingertip enables to manually place or remove the Hi-Fi cartridge from the vinyl record.
Diagram of the back of a turntable
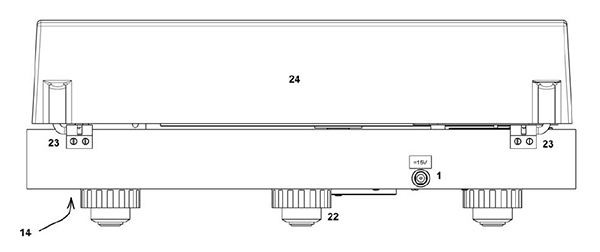
22. Feet: The base of the turntable rests on feet. Depending on the model of your vinyl record player, these feet can be adjustable, of different size, different composition, etc.
23. Dust cover hinge: This is where the dust cover hinges. The hinges can be different based on the models of turntables. Certain turntables do not even have dust cover hinges. In this case, there exist bell shaped dust covers, that simply rest on the edge of the base of the turntable.
24. Dust cover: This dust cover serves to protect the turntable from dust or of eventual damage in case of false manipulations, presence of a cat, or other.
*****
We hope that these explanations will enable you to better understand the different components of a turntable and their use. For more information, do not hesitate to contact our technicians by phone (+33 (0) 299 654 163) or by email (contact-inter@maplatine.com).